Vendor collaboration in D365 FO

This topic explains about how to add the external user of the vendor so that he can access to D365 FO vendor collaboration module and can work on the procurement process such as accept/reject Purchase order, create vendor invoice etc.

Step 1: Create a vendor (normal process). Note: You can even go with the existing vendor.

Navigate: Accounts payable> Vendors> All vendors

1 New vendor

Step 2: Add contact to the vendor

Navigate: Accounts payable> Vendors> All vendors

Select the vendor

In the vendor menu item, under contacts click on Add contacts

2 Add contacts

  1. Enter the first name, last name and other information as needed.
  2. Click contact information fast tab and enter the email address.

3 Contact information

3. Click on Allow access to vendor collaboration

A pop up window will arise asking for confirmation, click yes.

4 confirmation window

4. Click on Provision vendor user

A pop window will arise asking to:

Define business justification

Select the user roles

Then click on submit.

5 Provision user

Once you submit, the below message appears saying the user request is in process.

6 User submitted

Step 3: Process the vendor request

Navigate: Vendor collaboration> All contacts> Vendor collaboration user requests

You will find the user with the status as Pending approval.

Click on the Request ID to open the record

7 User pending approval.png

You can find 2 security roles added as well.

8 User roles.png

There will be couple of approval process for the user request based on the conditions, approve the workflow till it gets completed.

Condition 1: New user request

9 Condition 1.png

Approve the workflow

10 Approve workflow.png

Now the status will be changed to Azure AD B2B user invitation pending. In this stage click on the Export user invitation file to get the link. A CSV file will be downloaded. This link is useful for the vendor to login.

11 user invitation.png

Condition 2: Send Azure AD B2B user invitation

12 Condition 2.png

Complete the workflow:

13 Complete.png

Condition 3: Approve creation of AX user

14 Condition 3.png

Once approved the status gets changed to Completed

15 Completed.png

Step 4: Verify the user created in system admin.

Navigate: System administration> Users> Users

Filter the user id with the record and then click to view.

A new role will be added as “System external users”.

16 system user.png

Step 5: Activate vendor collaboration parameter to the vendor and assign the primary contact.

Navigate: Accounts Payable> Vendors> All vendors

Click on the vendor account

Select the appropriate option under the collaboration activation drop down

Here I will select as Active (PO is auto confirmed). This means once vendor accepts the PO in vendor portal automatically the PO will be confirmed in D365 FO.

17 collaboration active.png

Select the contact created above in the primary contact field under purchasing demographic fast tab of the vendor master.

18 primary contact.png

Save and close the form.

Step 6: Now the final step is to send/email the link to the vendor contact person.

Once the vendor contact person has received the link, he can login to D365.

19 login

Use forgot password option to set a new password.

20 forgot pswd.png

Below is the view of D365 FO to the vendor after successful login.

21 vendor view.png


Thanks for reading..!

Process to cancel/reverse bridge transactions in AX 2012

The below process explains about how to cancel or reverse the transactions from the bridge form.

Let’s say a customer payment is done using bridge method of payment.

Now this record needs to be cancelled from the bridge transaction for any reason, (due to wrong amount, wrong customer account etc.)
Process 1:
Create a customer payment against an invoice using Bridge method of payment:
Navigate: Accounts Receivable- Journals – Payment journal
Click New, select a journal name and click on Lines button

Select a customer, invoice and method of payment as bridge and post the record.

Verify the payment journal voucher in the customer transaction:

Verify the vouchers posted:

12101100 (Bridge A/c)   Dr           4370

12103001 (Customer A/c)                            Cr            4370

Process 2:

Now for the above transaction we want to cancel/reverse the transaction.

Navigate: General Ledger- Journal – General Journal

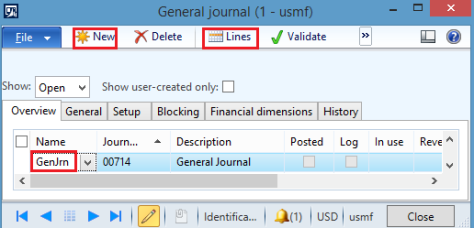
Click new, select a journal name and click on Lines.

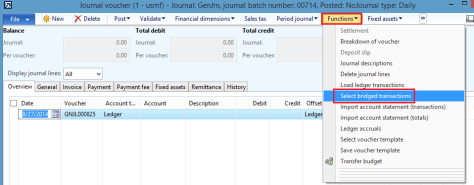
Then click on functions button and further click on “Select bridged transactions”. This will open a new form.

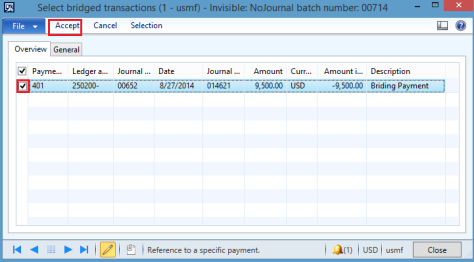
Bridge form:

This form will show the payment record which was posted in above process 1 for the customer.

The options available in this form are “Accept, cancel and Selection.

Accept means this record has been cleared in your bank

Cancel means just cancel the selected record and close the form

Selection means to select the number of records up to a certain date.

As stated above since there is no option to reverse this transaction, we will now see how to reverse/cancel this record from Bridge transaction.

Process 3:

Navigate to customer transaction form:

Accounts receivable- Common- Customers – All customer

Look for the customer, click on transaction button.

Select the payment record (posted in process 1 above)

Then click on cancel payment- select date and reason code click on OK button to cancel the payment.

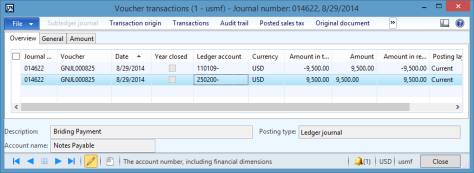
This will now reverse the bridge record and a reversal record is created for the same.

Verify the vouchers posted:

12103001 (Customer A/c)            Dr           4370

12101100 (Bridge A/c)                                   Cr            4370

Process 4:

Now repeat process 2 to verify the bridge form whether the record exists or not.


Just for your knowledge…!


Import Released Product & Product Master Data through Data Import Export Framework

The Microsoft Dynamics AX 2012 Data Import/Export Framework helps you import and export data in AX which include master data, open stock, and balances.

  • For Microsoft Dynamics AX 2012 R3, Data Import/Export Framework is included in the release.
  • For Microsoft Dynamics AX 2012 R2, Data Import/Export Framework is available in cumulative update 7 for Microsoft Dynamics AX 2012 R2.
  • For AX 2012 or Microsoft Dynamics AX 2012 Feature Pack, Data Import/Export Framework is available from Information Source-download.

Step 1: Define Parameters

Navigation: Data import export framework > Setup > Data import/export framework parameters

  • Create a folder in your directory
  • Browse the location for the folder which is created
  • Validate the directory, it will show the Green check box

a1

Step 2: Pre-defined Entities in AX

AX has some of the pre-defined entities inbuilt in the application of which we will use one of them.

Navigation: Data import export framework > Setup > Target Entities

a2

Step 3: Create Source Data formats

Navigation: Data import export framework > Setup > Source Data formats

Determine the source of the data to export or import, and create a source data format for the data. For export, the source is AX. For import, you can use any of the following sources:

  • AX– Import data from another Microsoft Dynamics AX instance.
  • ODBC– Import data from another database, such as Microsoft SQL Server or Microsoft Access.
  • File– Import data from a fixed-width or delimited text file, XML file, or Microsoft Excel file.
  • Source as “Comma”
  • Enter a description for it as “Comma separated file”
  • Type – select the type as “File”
  • In the General area on the right side of the form select
    • Column delimiter as “comma (,)”

a3

Once the above setups are done we will now start creating target entities for which we want to upload the data in AX

Step 4: Create Processing group

Navigation: Data import export framework > Common > Processing group

  • Click on New on to create a new group
  • Enter group name as Released Product
  • Enter a suitable description
  • Then click on Entities to get the required fields and move on to next step

a4

Step 5: Select entities for processing

Once you click on Entities in the above step it will open a new form wherein we need to create

  • Click on New button
  • Select the Entity as “Released Product” from the drop down
  • Select the Source data format as “comma” create in Step 3
  • Then click on the Generate source file to select the required fields
  • With this entity we can upload /release Product as well as Product Master.

a5

Step 6: Generate Source file

Once you click on Generate source file a new wizard will be generated to create a template

  • Click on Next

a6

Step 7: Select the required fields to upload the Released Product and Product master


  • Select the Field name which are required to upload
  • By default some of the mandatory fields are selected
  • Apart from them you can select some other fields as shown in the below image. (based on the what data you want to import)
  • Then click on Generate Sample File to generate a notepad for the selected fields with comma delimited
  • Click on Finish button

Note: If you would like to know the field name then right click on the field in the released product form to get the field name as shown below.

  • Say you want to know the field name of “Total discount” under Sell fast tab
  • Right click on the respective field and click on personalize

a7

  • It will show the AOT name in the personalization screen which is used in the DIEF entity.

a8

  • Search for the AOT name in the DIEF wizard and mark the check box “Present in source”

a9

a10

a11

Step 8: Copy the data from notepad and paste it in excel

  • Place the cell in the first column
  • Click on the menu – Data
  • Then click on Text to columns
  • Choose Delimited
  • Click on Next
  • Select “Comma” in the delimiters and click on Finish button

a12

Step 9: Enter the data in respective columns.

  • You can enter multiple records and make sure Product dimension groups are already created in AX in advance and use the same values in this sheet.
  • Once after completion of the data
  • Save the file as “CSV (Comma delimited)” in a folder

a13

Step 10: Upload the excel file in the Processing group

Navigation: Data import export framework > Common > Processing group – Entities button

  • Browse the file which is created in the above Step 9
  • Click on Generate source mapping (an info log will be shown as “Items entity mapping done successfully”)
  • The validate the file (an info log will be shown as “Items” entity is validated for data import/export”)
  • You can get a preview of the data which is to be uploaded

a14

Step 12: Get staging data

Navigation: Data import export framework > Common > Processing group

  • Select the Processing group – Released Product
  • Then click on “Get staging data”

a15

Step 13: Staging job

  • A Staging job form will be opened
  • Job ID
  • Enter the description

Then click on OK

a16

Step 14: Run the staging data

  • You can even get the preview of the data at the lower pane of the form
  • Click on Run button to execute the staging

a17

  • We can even setup Batch processing by selecting the Batch check box and setup Recurrence
  • To execute the job immediately, Click on OK

a18

  • An info log is generate for the same showing the number of records inserted

a19

Step 15: Copy data to target

Navigation: Data import export framework > Common > Processing group

  • Select the Entity – Released Product
  • Click on Copy data to target

a20

Step 16: Select a Job Id

  • Select the Job ID which is created in the above Step 13
  • Click on OK

a21

Step 17: Run the Job

  • Select the Entity and Run the Job

a22

  • We can even setup Batch processing by selecting the Batch check box and setup Recurrence
  • To execute the job immediately, Click on OK

a23

  • An info log is generate for the same showing the number of records inserted

Step 18: View the records uploaded in AX

Navigation: Product information management > Common > Released Products

  • 4 records are created
  • We can edit and enter additional information if required

a24

Note: To upload data for few of the other fields which are not available in DIEF entity, we can use excel add-in method which will be shown in separate topic.

Import Product & Product Master Data through Data Import Export Framework

The Microsoft Dynamics AX 2012 Data Import/Export Framework helps you import and export data in AX which include master data, open stock, and balances.

  • For Microsoft Dynamics AX 2012 R3, Data Import/Export Framework is included in the release.
  • For Microsoft Dynamics AX 2012 R2, Data Import/Export Framework is available in cumulative update 7 for Microsoft Dynamics AX 2012 R2.
  • For AX 2012 or Microsoft Dynamics AX 2012 Feature Pack, Data Import/Export Framework is available from Information Source-download.

Step 1: Define Parameters

Navigation: Data import export framework > Setup > Data import/export framework parameters

  • Create a folder in your directory
  • Browse the location for the folder which is created
  • Validate the directory, it will show the Green check box

Figure 1

Step 2: Pre-defined Entities in AX

AX has some of the pre-defined entities inbuilt in the application of which we will use one of them.

Navigation: Data import export framework > Setup > Target Entities

Figure 2

Step 3: Create Source Data formats

Navigation: Data import export framework > Setup > Source Data formats

Determine the source of the data to export or import, and create a source data format for the data. For export, the source is AX. For import, you can use any of the following sources:

  • AX– Import data from another Microsoft Dynamics AX instance.
  • ODBC– Import data from another database, such as Microsoft SQL Server or Microsoft Access.
  • File– Import data from a fixed-width or delimited text file, XML file, or Microsoft Excel file.
  • Source as “Comma”
  • Enter a description for it as “Comma separated file”
  • Type – select the type as “File”
  • In the General area on the right side of the form select
    • Column delimiter as “comma (,)”

Figure 3

Once the above setups are done we will now start creating target entities for which we want to upload the data in AX

Step 4: Create Processing group

Navigation: Data import export framework > Common > Processing group

  • Click on New on to create a new group
  • Enter group name as Product
  • Enter a suitable description
  • Then click on Entities to get the required fields and move on to next step

Figure 4

Step 5: Select entities for processing

Once you click on Entities in the above step it will open a new form wherein we need to create

  • Click on New button
  • Select the Entity as “Product Master” from the drop down
  • Select the Source data format as “comma” create in Step 3
  • Then click on the Generate source file to select the required fields
  • With this entity we can upload Product as well as Product Master.

Figure 5

Step 6: Generate Source file

Once you click on Generate source file a new wizard will be generated to create a template

  • Click on Next

Figure 6

Step 7: Select the required fields to upload the Product and Product master

  • Select the Field name which are required to upload
  • By default some of the mandatory fields are selected
  • Apart from them you can select some other fields as shown in the below image.
  • Then click on Generate Sample File to generate a notepad for the selected fields with comma delimited
  • Click on Finish button

Figure 7

Step 8: Copy the data from notepad and paste it in excel

  • Place the cell in the first column
  • Click on the menu – Data
  • Then click on Text to columns
  • Click on Next
  • Select “Comma” in the delimiters and click on Finish button

Figure 8

Step 9: Enter the data in respective columns.

  • You can enter multiple records and make sure Product dimension groups are already created in AX in advance and use the same values in this sheet.
  • Once after completion of the data
  • Save the file as “CSV (Comma delimited)” in a folder
  • For Product select the product sub type as “Product” and product type as “Service” for service items.

Figure 9

  • For Product master select the product sub type as “Product master” and product type as “Item” for item master.

Figure 10

Step 10: Upload the excel file in the Processing group

Navigation: Data import export framework > Common > Processing group – Entities button

  • Browse the file which is created in the above Step 9
  • Click on Generate source mapping (an info log will be shown as “Product entity mapping done successfully”)
  • The validate the file (an info log will be shown as “Product” entity is validated for data import/export”)
  • You can get a preview of the data which is to be uploaded

Figure 11

Step 12: Get staging data

Navigation: Data import export framework > Common > Processing group

  • Select the Processing group – Product
  • Then click on “Get staging data”

Figure 12

Step 13: Staging job

  • A Staging job form will be opened
  • Job ID
  • Enter the description
  • Then click on OK

Figure 13

Step 14: Run the staging data

  • You can even get the preview of the data at the lower pane of the form
  • Click on Run button to execute the staging

Figure 14

  • We can even setup Batch processing by selecting the Batch check box and setup Recurrence
  • To execute the job immediately, Click on OK

Figure 15

  • An info log is generate for the same showing the number of records inserted

Figure 16

Step 15: Copy data to target

Navigation: Data import export framework > Common > Processing group

  • Select the Entity – Product
  • Click on Copy data to target

Figure 17

Step 16: Select a Job Id

  • Select the Job ID which is created in the above Step 13
  • Click on OK

Figure 18

Step 17: Run the Job

  • Select the Entity and Run the Job

Figure 19

  • We can even setup Batch processing by selecting the Batch check box and setup Recurrence
  • To execute the job immediately, Click on OK

Figure 20

  • An info log is generate for the same showing the number of records inserted

Step 18: View the records uploaded in AX

Navigation: Product information management > Common > Products > Products

  • 4 records are created
  • We can edit and enter additional information if required

Figure 21

Note: The same process can be used to upload the Product Master by creating the data in the same file or in a different file and repeat from step 10.

Bridging Method for Vendor Payments in Ax 2012

This method of payment is used when the payment is not directly dealt with the Supplier instead a Third Person or a Mediator is involved in it where in the Bank Account does got effect immediately due to clearing time consumed for Check.

Once the mediator confirms the check is cleared then on that particular date we can transfer from Intermediate account to Bank Account which will help in Bank Reconciliation.

Follow the below steps to work with Bridging Payment

Step 1: Create Bridging Method of Payment

Navigation: Accounts Payable > Setup > Payment > Method of Payment

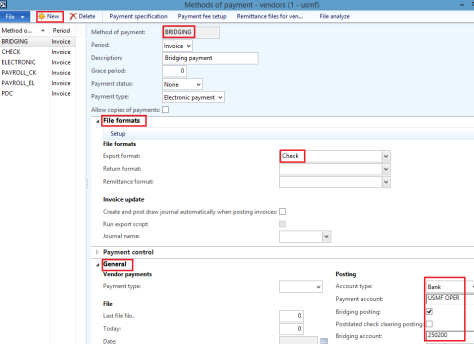
  • Create New method of payment
  • Enter a Name and Description
  • Under the File formats tab, select Check in the Export method
  • Under the General tab, Posting enter the information as shown below
  • Save and close the form

B Method of Payment

Step 2: Create a Payment Journal

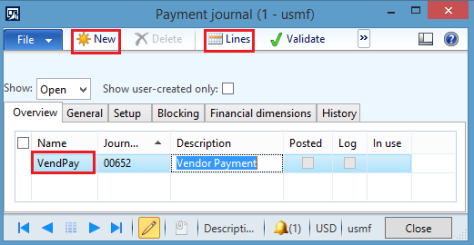
Navigation: Accounts Payable > Journals > Payment Journal

  • Create new Journal
  • Select a Journal name
  • Click Lines to enter the voucher details

B Journal

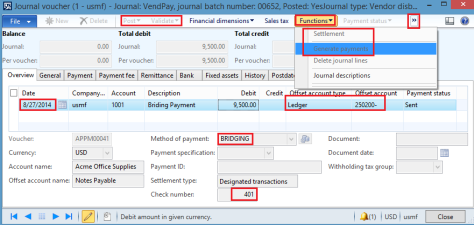
  • Enter Payment details
  • Select Payment date, Vendor Account, description
  • Select the invoice from Functions button, Settlement option for which payment is to be made
  • Select the Method of Payment as “Bridging” and notice the Offset account type and Offset ledger account are defaulted from Setup done in Method of Payment
  • Generate Check through Functions button – Generate Payments and view the Check number generated “401”
  • Validate and Post the journal
  • Verify the vouchers posted

B Lines

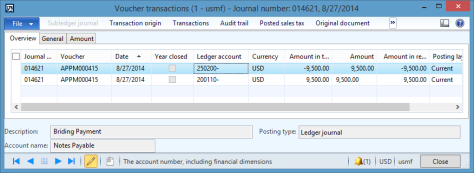
  • View the voucher posted to the journal

Vendor (Control) Account            Dr           9500

Bridging Account                                              Cr            9500

B Pay Vouchers

Step 3: Clear the Bridging Payment to Bank Account

Navigation: General Ledger > Journals > General Journal

  • Create new journal
  • Click on Lines button

B Gl Journal

  • Click on Functions button and then Select Bridged transactions

B GL Lines

  • In this form, we can view the Bridging entry posted
  • Select the line
  • Click on Accept to transfer posting to the journal

B Bridging


  • Once we accept it, the line gets transferred in the journal form
  • Select the Clearing date of the Check
  • Validate and Post the Journal
  • To view the vouchers posted, click on inquiries – voucher button

B Gl Post

  • View the voucher posted to the journal

Bridging Account                              Dr           9500

Bank Account                                                    Cr            9500

B Gl voucher

Once we clear the entry from bridging form, the actual entry gets posted to Bank Account on the selected date which can used for Bank Reconciliation

B Bank Trans


Was it Helpful?

Customer Prepayment in AX 2012

Under this chapter, we will see how to book the advance payment received from the Customer through Prepayment functionality and adjust it against a Sales Order Invoice.


Step 1: View the Customer balance

Navigation: Accounts Receivable > Common > Customers > All Customers

  • Select the respective Customer Account
  • Click on “Balance” button to view the Customer Balance

C Bal

  • You can view the balance for the Customer is Nil

C Bal 1

Step 2: Create Posting Profile

Navigation: Accounts Receivable > Setup > Customer Posting Profile

  • Create New
  • Specify Posting profile Name and Description
  • Under the Setup tab – provide the respective ledger accounts
  • Save and close the form

C Posting

Step 3: Setup Prepayment in Parameters

Navigation: Accounts Receivable > Setup > Accounts Receivable Parameters

  • Under the Ledger and Sales Tax
  • Expand the Payment tab
  • Enable the “Sales tax on prepayment journal voucher” to apply sales tax for advance payments
  • Select the Posting Profile as “PRE” from the drop down in the “Posting profile with prepayment journal voucher
  • Save and close the form

C Parameters

Step 4: Create a Payment Journal

Navigation: Accounts Receivable > Journals > Payments > Payment Journal

  • Click on New button
  • Select the Name
  • Then click on Lines button

C Journal

  • Enter the lines in the “Overview” tab
  • The click on the “Payment” tab
  • Select the “Prepayment journal voucher” check box
  • Once you enable the check box, the Posting profile gets changed to “PRE”
  • Validate and Post the Journal

C Lines

Step 5: Check the Customer Balance

Navigation: Accounts Receivable > Common > Customers > All Customers

  • Select the respective Customer Account
  • Click on “Balance” button to view the Customer Balance
  • You can view the balance as -2000 USD

C Bal Adv

Step 6: Create a Sales Order and apply the Payment to it

Navigation: Sales and Marketing > Common > Sales orders > All Sales orders

  • Under the Sales order tab
  • Click on Sales Order
  • Select the Customer Account
  • Click on OK

C SO

  • Enter the Sales line details, the Net amount for this Sales Order is USD 10000
  • Confirm the Sales order and also complete the remaining steps such Pick and Pack
  • Then click on Invoice tab to apply the advance payment and complete the sales order

C So Confirm


  • Under the Invoice tab, Click on Open transactions settle

C SO invoice

  • A new form opens showing the Prepayment amount which was raised for USD 2000
  • Select the Mark check
  • Click Yes in the dialog box to apply the prepayment
  • Close the form

C SO Mark

  • Click on Invoice button to Post the Invoice

C So Invoice Complete

  • Select “All” in the Quantity under the head Parameter
  • Click on OK

C SO Invoiced

Step 7: Now verify the Customer Net Balance

Navigation: Accounts Receivable > Common > Customers > All Customers

  • Select the respective Customer Account
  • Click on “Balance” button to view the Customer Balance
  • So it’s showing as USD 8000
  • Click on Transactions button to view the entries posted

C Net Bal

  • Transactions posted for the Customer Account

C Trans


Does it helps you?

Configure Automatic Exchange Rates in AX 2012

With the help of the simple setup we can automatically update the currency exchange rates through importing the Web service provided in AX 2012 and also can define a batch process periodically.

Follow the below steps to configure automatic exchange rates:

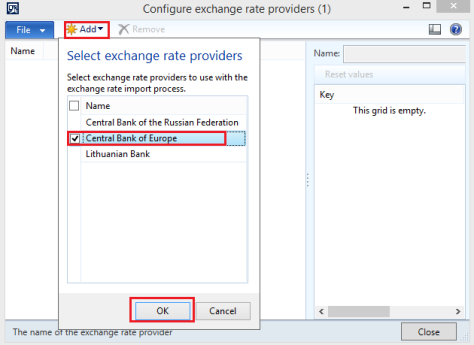
Step 1: Select the Exchange Rate Provide

Navigation: General Ledger > Setup > Currencies > Configure Exchange Rate Providers

  • Click on Add
  • Select the Exchange Rate Provider
  • Click on OK button

Ex Configure

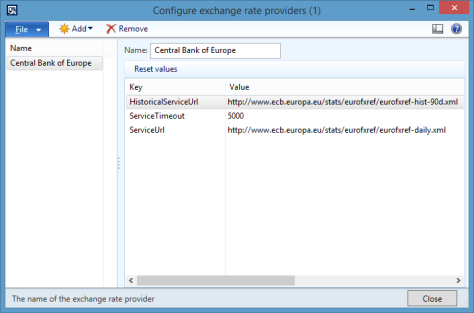
Once you click on OK, it will show the Service URL

Ex Web Service

Step 2: Verify the Exchange Rate type

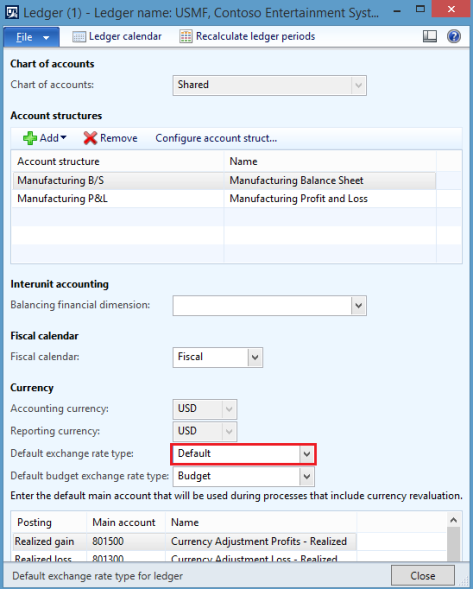
Navigation: General Ledger > Setup > Ledger

  • Default exchange rate type is set to “Default” which is used the by Legal Entity

Ex Ledger

Step 3: Import Currency Exchange Rates

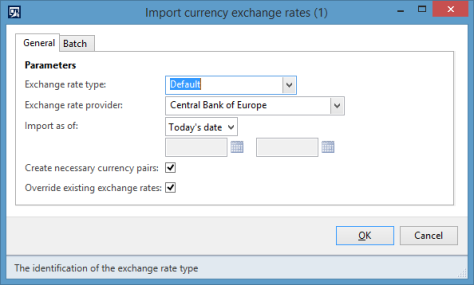
Navigation: General Ledger > Periodic > Import Currency Exchange Rates

  • Select the Exchange rate type “Default” (as per the setup done in Ledger form)
  • Select the Exchange rate provider
  • Define the Import as of: “Today’s date”. You can also define “Date range”
  • Enable the check box for “Create necessary currency pairs” to define the necessary pairs
  • Click on OK to
  • To Setup a Batch job, click on Batch and provide the Recurrences for periodic activity.

Ex Periodic

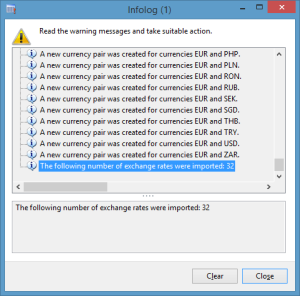
An info log gets appeared showing the numbers of records imported

Ex Info

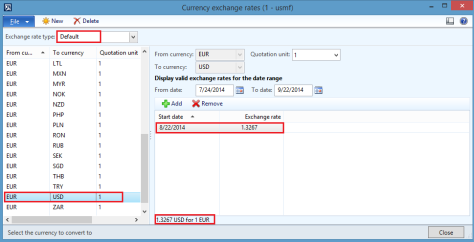
Step 4: View the Exchange Rates

Navigation: General Ledger > Setup > Currency Exchange Rates

  • Select the Exchange Rate type as “Default” from the dropdown
  • Now you can view the pairs created for all the currency codes which are provided by the “Central Bank of Europe”

Ex Exchange rates


Importing Opening Balances through Data Import Export Framework in AX 2012

Importing Opening Balances through Data Import Export Framework

The Microsoft Dynamics AX 2012 Data Import/Export Framework helps you import and export data in AX which include master data, open stock, and balances.

  • For Microsoft Dynamics AX 2012 R3, Data Import/Export Framework is included in the release.
  • For Microsoft Dynamics AX 2012 R2, Data Import/Export Framework is available in cumulative update 7 for Microsoft Dynamics AX 2012 R2.
  • For AX 2012 or Microsoft Dynamics AX 2012 Feature Pack, Data Import/Export Framework is available from Information Source-download.

Opening Balances are uploaded on a specific Cut-off date mostly end of the year and once they are uploaded in the system, we need to run the Year End Closure process so as to transfer them as Opening Balance to the next Financial Year. To upload the Opening Balance follow the below steps:

Step 1: Define Parameters

Navigation: Data import export framework > Setup > Data import/export framework parameters

  • Create a folder in your directory
  • Browse the location for the folder which is created
  • Validate the directory, it will show the Green check box

OPB Parameters

Step 2: Pre-defined Entities in AX

AX has some of the pre-defined entities inbuilt in the application of which we will use one of them.

Navigation: Data import export framework > Setup > Target Entities

OPB Entities

Step 3: Create Source Data formats

Navigation: Data import export framework > Setup > Source Data formats

Determine the source of the data to export or import, and create a source data format for the data. For export, the source is AX. For import, you can use any of the following sources:

  • AX– Import data from another Microsoft Dynamics AX instance.
  • ODBC– Import data from another database, such as Microsoft SQL Server or Microsoft Access.
  • File– Import data from a fixed-width or delimited text file, XML file, or Microsoft Excel file.
  • Source as “Comma”
  • Enter a description for it as “Comma separated file”
  • Type – select the type as “File”
  • In the General area on the right side of the form select
    • Column delimiter as “comma (,)”

OPB Comma

Once the above setups are done we will now start creating target entities for which we want to upload the data in AX

Step 4: Create Processing group

Navigation: Data import export framework > Common > Processing group

  • Click on New on to create a new group
  • Enter group name as Opening Balance
  • Enter a suitable description
  • Then click on Entities to get the required fields and move on to next step

OPB Processing Group

Step 5: Select entities for processing

Once you click on Entities in the above step it will open a new form wherein we need to create

  • Click on New button
  • Select the Entity as “Opening Balance” from the drop down
  • Select the Source data format as “comma” create in Step 3
  • Then click on the Generate source file to select the required fields

OPB Generate Source file

Step 6: Generate Source file

Once you click on Generate source file a new wizard will be generated to create a template

  • Click on Next

OPB wizard

Step 7: Select the required fields to upload the Opening Balance Entries

  • Select the Field name which are required to upload
  • By default some of the mandatory fields such as CurrencyCode, JournalNum, LineNum, Voucher are selected
  • Apart from them you can select some other fields such as Account Type, Amount Cur Credit, Amount Cur debit etc.
  • Then click on Generate Sample File to generate a notepad for the selected fields with comma delimited
  • Click on Finish button

OPB Selected fields

Step 8: Save the file in a folder and then open it in excel

  • Place the cell in the first column
  • Click on the menu – Data
  • Then click on Text to columns
  • Click on Next
  • Select “Comma” in the delimiters and click on Finish button

OPB excel

Step 9: Enter the data in respective columns.

  • You can enter multiple records
  • Make sure of the Journal Number and Voucher columns (enter the latest number)
  • Once after completion of the data
  • Save the file as “CSV (Comma delimited)” in a folder

OPB template

Step 10: Upload the excel file in the Processing group

Navigation: Data import export framework > Common > Processing group – Entities button

  • Browse the file which is created in the above Step 9
  • Click on Generate source mapping (an info log will be shown as “Opening Balance entity mapping done successfully”)
  • The validate the file (an info log will be shown as “Opening Balance entity is validated for data import/export”)

OPB upload template

Step 11: Preview of the data

  • You can get a preview of the data which is to be uploaded

OPB preview

Step 12: Get staging data

Navigation: Data import export framework > Common > Processing group

  • Select the Processing group – Opening Balance
  • Then click on “Get staging data”

OPB staging data

Step 13: Staging job

  • A Staging job form will be opened
  • Job ID
  • Enter the description
  • Then click on OK

OPB staging job

Step 14: Run the staging data

  • You can even get the preview of the data at the lower pane of the form
  • Click on Run button to execute the staging

OPB staging run

  • We can even setup Batch processing by selecting the Batch check box and setup Recurrence
  • To execute the job immediately, Click on OK

OPB staging OK

  • An info log is generate for the same showing the number of records inserted

OPB staging info

Step 15: Copy data to target

Navigation: Data import export framework > Common > Processing group

  • Select the Entity – Opening Balance
  • Click on Copy data to target

OPB copy data

Step 16: Select a Job Id

  • Select the Job ID which is created in the above Step 13
  • Click on OK

OPB copy data job

Step 17: Run the Job

  • Select the Entity and Run the Job

OPB copy data run

  • We can even setup Batch processing by selecting the Batch check box and setup Recurrence
  • To execute the job immediately, Click on OK

OPB copy data ok

  • An info log is generate for the same showing the number of records inserted

OPB Copy data info

Step 18: View the records uploaded in AX

Navigation: General Ledger > Journals > General Journal

  • Search for the Journal number
  • Click on Lines button to view the vouchers

OPB journal

  • Verify the vouchers
  • Validate and Post the Journal

OPB lines

  • An Info Log showing the number of vouchers posted

OPB journal info

Thanks for reading..

Broker Contracts in AX 2012 R3

Broker Contracts in AX 2012 R3

Configure and setup broker contracts in AX 2012 R3 as per the agreement dealt with the Broker for the services provided.

This process will help in managing payment of fees to brokers for the service of facilitating sales with broker contract management. This will reduce the administrative burden of broker payments. Broker Contract Management:

Steps to be followed:

  1. Create Broker as a Vendor Account
  2. Define Journal Names in the Accounts Payable Parameters
  3. Define Differential Reasons for Cancellation or variance in the payments
  4. Define Broker Charges Code for postings
  5. Create Broker Contract
  6. Approve the Broker Contract
  7. Create a Sales Order
  8. Approve Broker Claims
  9. Broker Payment
  10. Close the Broker Claim

Step 1: Create Vendor Account

Navigation: Accounts Payable > Common > Vendors > All Vendors

  • Create a new vendor account with appropriate Group and Currency

B Vendor

Step 2: Define Journal Names in the Accounts Payable Parameters

Navigation: Accounts Payable > Setup > Accounts Payable Parameters

Under the Broker and Royalty options, select the journal names used for posting the entries

  • “Invoice Journal name” used to create Vendor Liability
  • “Differential Journal name” used to post the cancelled brokerage amount
  • “Expense Journal name” used to post the broker expense account
  • Select the “Expense account” related to brokerage
  • “Manual posting” check box used to define whether the journal should be manually else the system will post the journals automatically.

B Parameters

Step 3: Define Differential Reasons for Cancellation or variance in the payments

Navigation: Accounts Payable > Setup > Broker > Differential Reasons

  • This is required for to provide reasons for differential postings

 B Reasons

Step 4: Define Broker Charges Code for postings

Navigation: Accounts Receivable > Setup > Charges > Charges Code

  • Enter Charge code name and description
  • Select the Prorate check
  • Enter the Debit and Credit type posting accounts with posting type

B Charges Code

Step 5: Create Broker Contract

Navigation: Accounts Payable > Common > Broker > Broker Contracts

  • Click on New button in the Broker Contract form
  • By default the status will be as “Planning”
  • Enter the “Broker Contract Id” and Description
  • Select the Vendor Account in the “Broker vendor account” field
  • Enter the valid period of the Contract i.e. From and To Date
  • Select the Charge code
  • Enter the Charges value

In the Lower pane of the form

  • You can specify the relation as Table, Group or All based on which the Contract will be applicable to the items

B Contracts

Step 6: Approve the Broker Contract

Navigation: Accounts Payable > Common > Broker > Broker Contracts

Once the details are filled in the Broker Contract and the contract should be applicable, change the status as “Approved”.

Note: Once the status is changed to “Approved” you cannot edit the Contract ID. You can even change the status to “Cancelled or Closed” if the contract does not take place.

B Contracts Approved

Step 7: Create a Sales Order

Navigation: Sales and marketing > Common > Sales order > All sales orders

Now to apply the Broker Charges, create a Sales order and then apply the charges it.

  • Create a New Sales order
  • Select the Item which is related to the Item group “Audio” as we have setup the contract for this particular item group in the Broker Contract
  • Click on the Sales order line and then click on Broker Commissions

B Sales order

You can view the Broker Commission applied to the Sales Order for the amount specified in the Broker Contract

B Commission

  • Complete the process by the Invoicing the Sales Order

Broker Posting done after the Sale invoice

Accrued Royalty and Brokerage Expense                              Dr           200

Royalty and Brokerage Accrual                                                   Cr            200

Note: These two accounts are mapped in the Broker Charges Code form (Step 4)

B Vouchers

Step 8: Approve Broker Claims

Navigation: Accounts Payable > Common > Broker > Broker Claims

Once the Sales Order is invoiced, you can view the claim in the Broker Claims form with the status as “Open”.

Enter the approved amount at the lower pane of the Claim form and then click on Approve button.

B Claims

You will get an info log showing the Claim and Expense Journal posted

B Info log

Below are the Posting for the Claim Journal No. 00720

Royalty and Brokerage                  Dr           200

Broker Vendor                                                  Cr            200

B Broker journal

Below are the Posting for the Expense Journal No. 00721

Commission Expenses                                   Dr           200 (A/c mapped in Item Group – Sales order)

Accrued Royalty and Brokerage Expense                              Cr            200

B Expense Journal

Step 9: Broker Payment

Navigation: Accounts Payable > Journals > Payments > Payment Journal

  • Click on New button to create a new journal
  • Select the Journal name
  • Click on Line button to enter the transaction

B Payment Journal

  • Enter the Payment date
  • Select the Vendor Account (Broker Account)
  • Select the invoice through Functions button – Settlement
  • Select the Offset Account
  • Validate and Post the journal

B Payment Lines

Step 10: Close the Broker Claim

You can even close the Broker Claim after Approving it.

Navigation: Accounts Payable > Common > Broker > Broker Claims

  • Select the Claim
  • Click on Close button

B Claim Closed

  • You can view the closed claims under the status “Closed”

B Claim Status Closed

Once the status is Closed you cannot edit the Broker Claim. 

Deductions Management in AX 2012 R3

Deductions Management in AX 2012 R3

There might be situation where a customer does not pay full invoice amount for some reason and you want to write off that remaining balance amount.

Through Deductions Management feature in Ax 2012 R3 it allows you to record such deduction amount and keep a track of such short pays.

Below are steps to configure and process Deductions Management


Step 1: Setup of Deduction Types

Navigation: Trade allowance management > Setup > Deductions > Deduction types

  • Create New
  • Enter the “Type and Description”
  • Enter the Account number in “Deduction offset” column to post the deduction amount.

Deduction Types

Step 2: Setup Deduction Denial Reasons

Create few records for tracking the reasons for returning the deduction back to the customer’s account when you deny the deduction.

Navigation: Trade allowance management > Setup > Deductions > Deduction Denial Reasons

  • Create New
  • Enter Reason code and Description

Deduction Reasons

Step 3: Setup Deduction Write-off reasons

Create reason codes for why you are allowing the deductions to be written off (accepted) and also specify the Main Account that you want to post the real adjustment to.


Navigation: Trade allowance management > Setup > Deductions > Deduction Write-off reasons

  • Create New
  • Enter Reason code and Description
  • Select an account in the “Main Account field”

Deduction Write off reasons

Step 4: Setup Deduction Journal name

Navigation: Trade allowance management > Setup > Trade allowance management parameters

  • Specify a Journal name which will be used for all the Deduction transactions

Deduction Parameters

Once the above setups are configured, now you can start tracking the deductions through below steps:


Step 5: Create a Customer Invoice

(You can create a Sales Order or a Free Text Invoice, in our case we will follow Free Text Invoice)

Navigation: Accounts Receivable > Common Forms > Free Text Invoice > All free text invoices

  • Select a Customer account for which you want to record an invoice
  • Enter the required fields in the Invoice Lines (lower pane of the form)
  • Post the Invoice

Deduction Free Text invoice

  • Get a Print of the Posted Customer invoice.

Deduction Free Text Print


Step 6: Customer Payment (Short Pay)

Navigation: Accounts Receivable > Journals > Payments > Payment Journal

  • Click on New button
  • Select the Journal Name
  • Click on Lines button

Deduction Payment Journals


  • Enter the lines in the voucher screen
  • Select the customer account
  • From the invoice column select the respective invoice number
  • The total amount of invoice directly gets entered in the credit column

Deduction Payment Lines


  • Now when the customer pays amount lesser than the actual invoice amount, just change the Credit amount to the actual amount received and accept the warning notice

Deduction Payment Lines marked

  • Then to enter the short pay amount, click on the Deductions menu button

Deduction Payment Lines Deductions form


  • In the Deductions form
  • Click on New button
  • Select the Deduction type in the “Type” column
  • Enter the Short Pay Amount in the “Amount” column
  • Click the Close button

Note: You can add more than one record to justify the Deduction amount with different Deduction Types

Deduction form


  • Now once you close the above form, a new record is inserted in the Journal Voucher for the Deduction amount with the offset ledger account specified in the Deductions Type
  • Validate and the Post the Journal

Deductions multiple lines

Step 7: Write-Off the Journal

Navigation: Trade allowance management > Common Forms > Deduction Benchmark

  • In this form, you will see all of the deductions that have been recorded. You can Split the deduction, Deny the deduction and return it to the customer account, or Write-Off the deduction as a valid deduction.
  • You can view the Status as “Open”

Deduction write off


  • To write off the amount, just click on the Write-Off button as shown in the above screen
  • Specify the reason code
  • Then click on the “OK”


Deduction write off reason code

  • Now the status is shown as “Closed” for this Deduction ID.
  • If required you can even “Reverse the Write-Off”

Deduction status closed

Step 8: View the Customer Transactions

Navigation: Accounts Receivable > Common Forms > Customers > All Customers

  • Select the Customer Account
  • Click on the Transactions button

Deductions customer trans


Thanks for reading…